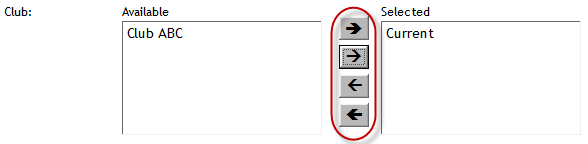
Using the Multi-Select List
Many of the metrics Options menus use the multi-select list for selecting clubs, departments, and other values.
The Available list to the left shows items that are available to be placed on the display, but are not currently selected.
The Selected list to the right shows items that will be displayed.
Each item will only appear in one of these lists.
- To select an item to display, click on the item name under Available, then click the small right-facing arrow
 to move it to Selected.
 - To display all available items, click the big right-facing arrow
 to move them to Selected.
 - To remove an item from the display, click on the item name under Selected, then click the small left-facing arrow
 to move it to Available.
 - To remove all items from the display, click the big left-facing
 arrow to move them to Available.
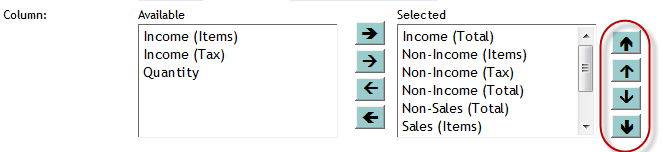
Some multi-select lists also enable you to change the order of items that appear.
- To move an item to the top of the list, click on the item name under Selected and click the big up-pointing arrow
 .
. - To move an item up one level, click on the item name under Selected and click the small up-pointing arrow
 .
. - To move an item down one level, click on the item name under Selected and click the small down-pointing arrow
 .
. - To move an item to the bottom of the list, click on the item name under Selected and click the big down-pointing arrow
 .
.
![]() © 2026 ABC Fitness Solutions, LLC.
© 2026 ABC Fitness Solutions, LLC.